MJPEG streams from a Kinect in 3 flavors: Python, Go and C
Martino Trapanotto / November 2025 (4098 Words, 23 Minutes)
The Xbox Kinect is probably the cheapest depth sensor available, found for around 20 euros on eBay.
It’s even cheaper if you already own one from being a kid, and it’s still a valid piece of hardware.
In this project I decided to learn more about it and how to use it. More specifically, I decided to focus on exposing its data stream in a format that would be easy to take advantage of, so I build three versions of an MJPEG server that serves the RGB and depth data.
The Kinect
Released in November 2010, the Kinect was a peripheral for Microsoft’s Xbox 360, as a response to the motion control craze started in 2008 by Nintendo’s Wii.
While the competition used existing solutions based IMUs and IR point tracking, the Kinect used advanced computer vision and specialized hardware to produce real time RGB and depth data.
This was a major hardware evolution for consumer electronics, and combined with various algorithms, it brought state-of-the-art pose data to developers and consumers, which could now use their body as a controller.
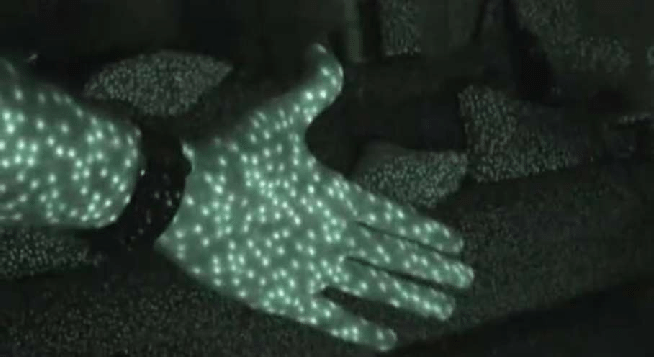
It leveraged a new approach developed by RealSense, using structured IR light patterns.
This technique measures depth and shape information of a 3D environment by projecting a known light pattern on it.
The distortion in the pattern is captured by a camera, that uses the difference between the known original pattern and what it sees to estimate distances and shapes.
The approach avoids issues with most textures, which can influence RGB based reconstruction, like stereographic approaches, and is resistant to changes in environmental light, as long as the single of the pattern is not overwhelmed, for example from the sun.
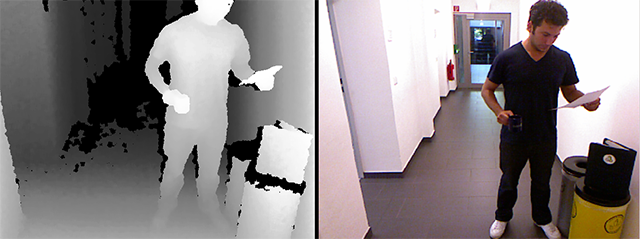
The resulting data is still imperfect, suffering from noise, lack of accurate calibration and the limitations of 2009 hardware. The output resolution is nominally 640x480, with a refresh rate of 24Hz.
The paired RGB camera is similar, with top output resolution of 1280x1024 but only at 15Hz, or the usual 640x480 at 30Hz.
While its legacy in gaming circles is of a half-forgotten slip-up for Microsoft, the unique and accessible hardware captivated many creators and developers.
It can still often be seen in museums and interactive art installations, it became a common component of low-cost robotics, and its legacy still runs along. Microsoft’s interest in the product waned in the years, with both models loosing support into Windows 10. An industrial version called Azure Kinect was introduced in 2020, and discontinued 3 years later.
Thankfully, the Kinect had quickly attracted a host of hackers and developers, and they were never too concerned with Microsoft’s opinions on the matter, as they had LibFreenect on their side.
LibFreenect
Open source developers were first on the scene, with the first commit in November 2010, a few hours after it had released on Europe, netting the developer 3k$ from Adafruit.
The project created a user space driver, leveraging LibUSB to provide a simple way to access the RGB, IR, Depth data and more from the cameras, IMU data and control of the tilt motors and sensors, and even the microphone array.
The project is now in stasis, with the last commit from January 2024. The official website is also apparently dead, and only reachable from the Wayback Machine.
The library is more or less in pure C, and supports Windows, Linux and MacOS. ARM support is not noted.
It also includes some wrappers to easily access the data from other languages, including C++, Python, Java and another in C using a synchronous API, instead of the async callback design of the base library.
As I used the library I noticed some issues, especially the aging interfaces with other languages.
The Python packages are created through Cython and NumPy, but both are broken on recent versions, with NumPy being stuck at around 1.23. Moreover, recent changes in Python are also problematic, so Python must be before 3.12.
I wanted to access the depth data efficiently, and I wanted to use a simpler interface than directly calling C functions. I also wanted to easily visualize the data, move it in a standard and simple format and perhaps even move it though a network, instead of being fixed on a single machine. So I focused on that, and chose MJPEG
MJPEG
MJPEG is a pretty old and simple video format. Frames are stored simply as JPEG images and shown.
Compared to modern inter-frame compression techniques like H.264 it’s massively inefficient space wise, but the extreme simplicity of it means that little computational power or custom hardware is required to create or display it, random access to frames is extremely fast, and it’s very easy to create as a real time stream.
This simplicity was greatly appreciated in decades prior and makes it still relevant for certain tasks, such as low latency streaming and low power devices.
It should be simple enough both to implement and use.
In the web context, the stream is simply identified by a unique header multipart/x-mixed-replace; boundary=frame.
From here, the client knows that the stream will now be composed of individual frames, passed as image bytes, and a boundary to identify the transition to a new frame, the boundary defined in the original header.
Implementation
Python
In Python the main hurdle was getting Freenect to work, more than creating the MJPEG stream.
It conflicts with the recent changes in build tools, so Python must be 3.11 or lower, NumPy is locked at 1.23.
Also, know that CMake is calling findPython3 which looks through the system autonomously instead of asking the terminal, so unless your system has the required version you have to go and fiddle with the relevant CMake. This is done by adding set(Python3_EXACTVERSION <version>) and adding the valid installed version.
After fixing the environment and CMake, compiling, installing the C libs and the Python libs, we’re ready to serve some HTTP requests.
In abridged form, the Python code is simply:
# Load libraries
import freenect
from http.server import BaseHTTPRequestHandler, ThreadingHTTPServer

# Create our handler for the stream
class MJPEGHandler(BaseHTTPRequestHandler):
    # in front of a GET request
    def do_GET(self):
        self.send_response(200)
        # Prepare a loop
        self.active = True
        while self.active:
            # Send the main header
            self.send_header("Content-Type", "multipart/x-mixed-replace; boundary=frame")
            self.end_headers()
            # Check the path
            if self.path == "/depth":
                # Extract and normalize the frame, which is otherwise out of bounds for color values
                depth_frame, _ = freenect.sync_get_depth()
                normalized_depth_frame = (depth_frame - depth_frame.min())/(depth_frame.max()) * 255
                # Convert to a JPEG image
                jpeg_buffer = io.BytesIO()
                img = Image.fromarray(normalized_depth_frame)
                depth_img = img.convert("RGB")
                depth_img.save(jpeg_buffer, format="JPEG", quality=85)
            jpeg_data = jpeg_buffer.getvalue()

            # Stream over HTTP
            try:
                self.wfile.write(b"--frame\r\n")
                self.send_header("Content-Type", "image/jpeg")
                self.send_header("Content-Length", len(jpeg_data))
                self.end_headers()
                self.wfile.write(jpeg_data)
            except BrokenPipeError or ConnectionResetError:
                # Catch Pipe fails or Resets if client disconnects
                print("connection ended")
                self.active = False

MPEG_Server = ThreadingHTTPServer(("0.0.0.0", 8080), MJPEGHandler)
As expected of Python, the core libraries make the code very simple, and trouble is mostly in the infrastructure and long term support, but any form of post-processing or accessing anything else would be a breeze.
Just don’t think about moving it to another machine.
Go
As there is no official Go wrapper (version 1.0 came in 2012), we have to go through another language.
Thankfully, Golang has a native CGo solution to interact with C, and we can use the C synchronous wrapper to read frames with little issue.
The CGo code is strictly relegated at import time and in a few calls. I found the official CGo Docs quite limited and lacking in detail, but various blog posts and Stack Overflow answers helped quite a bit.
The import "C" call is preceded by a short section of C code, containing import #includes or any additional declarations. Here we can also notice the compiler flags.
The only thing of note is that I have to force the linker to look for the Freenect libs in a specific folder, but that should be only a me issue:
package main

/*
#cgo LDFLAGS: -L/usr/local/lib -lfreenect_sync -lfreenect
#include <stdio.h>
#include <stdlib.h>
#include <string.h>
#include <libfreenect/libfreenect_sync.h>
#include <libfreenect/libfreenect.h>
*/
import "C"
import (
...
Functions, types, constants and anything else coming in from C are simply accessed by prepending C. to their name, with some special extra rules for structs.
The unsafe package gives us tools to work with raw pointers: Pointer is more or less equivalent to a C void*, and can be passed to a C function to be filled, while uintptr allows us to manipulate the pointer address, which is otherwise locked out in Go.
Accessing the synchronous C wrapper makes our life a lot easier than the raw one, as it does all the initialization and allocation behind the scenes. Thus, with a single call, a couple pointers and some parameters we access our depth data.
We also need to parse this form a 10 bit value into RGB, here done with a little bit-manipulation.
Each pixel is then filled in individually, and passed to the MJPEG stream:
func get_depth_image(frame_info C.freenect_frame_mode) image.Image {
// Get the video frrame
var data unsafe.Pointer
var timestamp C.uint
//val :=
C.freenect_sync_get_depth_with_res(&data, ×tamp, 0, C.FREENECT_RESOLUTION_MEDIUM, C.FREENECT_DEPTH_10BIT)
RGB_image := image.NewRGBA(image.Rect(0, 0, int(frame_info.width), int(frame_info.height)))
for y := 0; y < int(frame_info.height); y++ {
for x := 0; x < int(frame_info.width); x++ {
// Calculate the index in the RGB data
index := (y*int(frame_info.width) + x)
col_16 := (*(*C.uint16_t)(unsafe.Pointer(uintptr(data) + uintptr(index)*unsafe.Sizeof(uint16(0)))))
r := uint8(col_16 >> 2)
b := uint8(col_16 << 4)
// Set the pixel in the image
RGB_image.SetRGBA(x, y, color.RGBA{r, 0, b, 255})
}
}
return RGB_image
}
The get_MJPEG_feed is a wrapper that allows to reuse code between different versions with differing frame modes and processing to convert the raw buffer into actual RGB images.
The frame_handler is the get_depth_image we just saw.
The code isn’t very complex by itself, but the need to use a multipart.NewWriter is relevant, as the common usage pattern leads to major performance issues, and I found this solution thanks to Nathan Smith’s code:
func get_MJPEG_feed(w http.ResponseWriter, r *http.Request, frame_info C.freenect_frame_mode, frame_handler func(frame_info C.freenect_frame_mode) image.Image) {
	mimeWriter := multipart.NewWriter(w)
	mimeWriter.SetBoundary("--boundary")
	contentType := fmt.Sprintf("multipart/x-mixed-replace;boundary=%s", mimeWriter.Boundary())
	w.Header().Add("Cache-Control", "no-store, no-cache, must-revalidate, pre-check=0, post-check=0, max-age=0")
	w.Header().Add("Content-Type", contentType)
	w.Header().Add("Pragma", "no-cache")
	w.Header().Add("Connection", "close")

	for {
		partHeader := make(textproto.MIMEHeader)
		partHeader.Add("Content-Type", "image/jpeg")
		var img = frame_handler(frame_info)

		partWriter, partErr := mimeWriter.CreatePart(partHeader)
		if nil != partErr {
			fmt.Println(fmt.Sprintf(partErr.Error()))
			break
		}
		buf := new(bytes.Buffer)
		err := jpeg.Encode(buf, img, nil)
		if err != nil {
			return
		}
		if _, writeErr := partWriter.Write(buf.Bytes()); nil != writeErr {
			fmt.Println(fmt.Sprintf(writeErr.Error()))
		}
	}
}
The main is quite simple, using the integrated http library to create a callback associated with the URL and starting the server:
func main() {

	http.HandleFunc("/depth_feed", func(w http.ResponseWriter, r *http.Request) {
		var frame_info C.freenect_frame_mode
		frame_info = C.freenect_find_depth_mode(C.FREENECT_RESOLUTION_MEDIUM, C.FREENECT_DEPTH_10BIT)
		get_MJPEG_feed(w, r, frame_info, get_depth_image)
	})
	err := http.ListenAndServe(":3333", nil)
	if errors.Is(err, http.ErrServerClosed) {
		fmt.Printf("server closed\n")
	} else if err != nil {
		fmt.Printf("error starting server: %s\n", err)
		os.Exit(1)
	}
}
This was quite a step-up in complexity over Python, needing to manually wrangle data into RGB values, accessing and working with C calls directly, learning some subtleties and oddities of CGo, but it didn’t pose major issues as most things could be resolved with thought, experimentation and some reference material.
I actually found it quite enjoyable, having a large enough standard library and documentation that I found more accessible, although the CGo section was very much lacking.
The resulting executable is also not actually that portable, as Freenect still need to be built and installed on each machine, but we don’t have to worry as much about middleware libraries or version updates, and binaries do not require additional runtimes.
C
Here I had some struggles, not especially with the Freenect library but in establishing the MJPEG stream itself.
It’s very likely that my decision to use minimal libraries nor C++ and some established packages were the sole sources of this pain, but I chose this bike and I rode on it.
I decided to use a simple oriented set of libraries, so I settled on microhttpd for the HTTP handling and libjpeg for the image compression.
Both were major pains due to my lack of experience and their unfamiliar documentation.
Starting easy, the main sets up the microhttpd daemon, which sets up answer_to_connection as a callback function for any connection to the server.
daemon = MHD_start_daemon(MHD_USE_INTERNAL_POLLING_THREAD, PORT, NULL, NULL,
                            &answer_to_connection, NULL, MHD_OPTION_END);
answer_to_connection mostly prepares the connection context and starts the streaming process.
The context is set up first by allocation and filling out the state of the connection and preparing a MemoryBuffer for the PNG data and the frame information, based on the kind of image being requested:
enum MHD_Result answer_to_connection(void *cls, struct MHD_Connection *connection,
                                     const char *url,
                                     const char *method, const char *version,
                                     const char *upload_data,
                                     long unsigned int *upload_data_size, void **con_cls) {
  ...
    // Check state of connection
    if (*con_cls == NULL) {
      // First - initialize connection state
      struct connection_state *state = malloc(sizeof(*state));
      state->state = SEND_HEADER;
      state->offset = 0;
      *con_cls = state;
      // Set information regarding Kinect data and JPEG settings
      if (strcmp("/feed_depth", url) == 0) {
        state->frame_info = freenect_find_depth_mode(FREENECT_RESOLUTION_MEDIUM, FREENECT_DEPTH_10BIT);
        state->is_depth=1;
        state->is_monochrome = FALSE;
      }
      return MHD_YES;
    }
Next step is starting the stream, which is done by using MHD_create_response_from_callback.
microhttpd will send the first headers by itself, while the callback runs continuously:
    // Create streaming response
    struct MHD_Response *response = MHD_create_response_from_callback(
        MHD_SIZE_UNKNOWN, 4096,
        &content_reader,
        *con_cls,
        &free_connection_state);
    // Prepare and submit first set of headers
    MHD_add_response_header(response, "Content-Type", CONTENT_TYPE);
    enum MHD_Result ret = MHD_queue_response(connection, MHD_HTTP_OK, response);
    MHD_destroy_response(response);
    return ret;
}
Here is the magic sauce powering the stream, which works by switching between two states, one where we send the MJPEG interframe header, and one where we upload the frame.
Some care is necessary, as the upload frames are limited in size, with the lmit passed in input as max. Any function call can only push a certain amount of data. Any exceeding data will be pushed on the next call.
// connection callback, continuously serves frames and boundaries until the connection is severed
static ssize_t content_reader(void *cls, uint64_t pos, char *buf, size_t max) {
struct connection_state *conn = (struct connection_state *)cls;
if (conn->state == SEND_HEADER) {
// First phase - send frame boundary and prepare next frame to be served
// not technically a header but an interframe string
const char *header =
"\r\n--" BOUNDARY
"\r\n"
"Content-Type: image/jpeg\r\n\r\n";
// write the header in a char array
char header_buf[256];
//check if header is too big for this connection frame
// write what can be written to connection buffer
size_t to_copy = header_len - conn->offset;
if (to_copy > max) to_copy = max;
memcpy(buf, header_buf + conn->offset, to_copy);
conn->offset += to_copy;
if (conn->offset >= header_len) {
conn->state = SEND_DATA;
conn->offset = 0;
printf("CREATING JPEG\n");
// Create a JPEG image from the RGB data
unsigned char *data;
unsigned int timestamp;
freenect_sync_get_depth_with_res((void **)(&data), ×tamp, 0, conn->frame_info.resolution, conn->frame_info.depth_format);
// Parse raw bytes into RGB pixel values
data = depth_to_RGB(data, conn->frame_info);
conn->mem = image_to_JPEG(data, conn->frame_info, conn->is_monochrome);
// depth_to_RGB allocates a new memory segment that has to be freed
if (conn->is_depth == 1){
free(data);
}
if (image_to_PNG(conn->mem, data, conn->frame_info, conn->output_bit_depth, conn->PNG_COLOR_TYPE)) {
printf("ERROR IN PNG");
return MHD_NO;
}
}
return to_copy;
}
if (conn->state == SEND_DATA) {
size_t remaining = conn->mem->size - conn->offset;
if (remaining == 0) {
conn->state = SEND_HEADER;
conn->offset = 0;
free(conn->mem->buffer);
return 0;
}
size_t to_copy = (remaining > max) ? max : remaining;
memcpy(buf, conn->mem->buffer + conn->offset, to_copy);
conn->offset += to_copy;
return to_copy;
}
return 0;
}
Working with C was perhaps not the most effective way, and consumed the majority of my time, both in structuring the logic and simply figuring out how to implement the stream in the first place.
The microhttpd docs didn’t have any direct examples of this and were a bit bare and lacking in examples for my tastes, and similar issues plagued my usage if libpng and libjpeg. Even LLMs struggled in producing anything useful. Some very important info was available after more thorough digging, such as the microhttpd mailing list which pointed me in the right direction, and some usage examples on GitHub of the jpeg and png libraries.
I also had to contend with some memory management issues as I had to plug multiple memory leaks, some quite evident, some that I only found out after using Valgrind.
JPEG vs PNG
The first version of these servers did not use JPEG, but instead encoded images using in PNG. This was not a calculated choice, but little more than a “I wonder if this works”.
Firefox accepted the MPNG stream without issue, but there was a noticeable delay in the video, and encoding multiple streams together tanked framerates in Go, while the MJPEG in Python behaved normally, even when multiple streams ran together.
Using Go’s pprof, I found out the obvious issue: PNG encoding is not apt for real time performance, due to the complexity and multiple passes often need on each pixel. The DEFLATE scheme is optimized for compression performance and lossless results, but not speed.
A quick timing of the functions revealed that the encoding took from 60 to more than 100ms per frame, while fetching the raw data and parsing it to a Golang image.Image only takes 15 to 25ms.
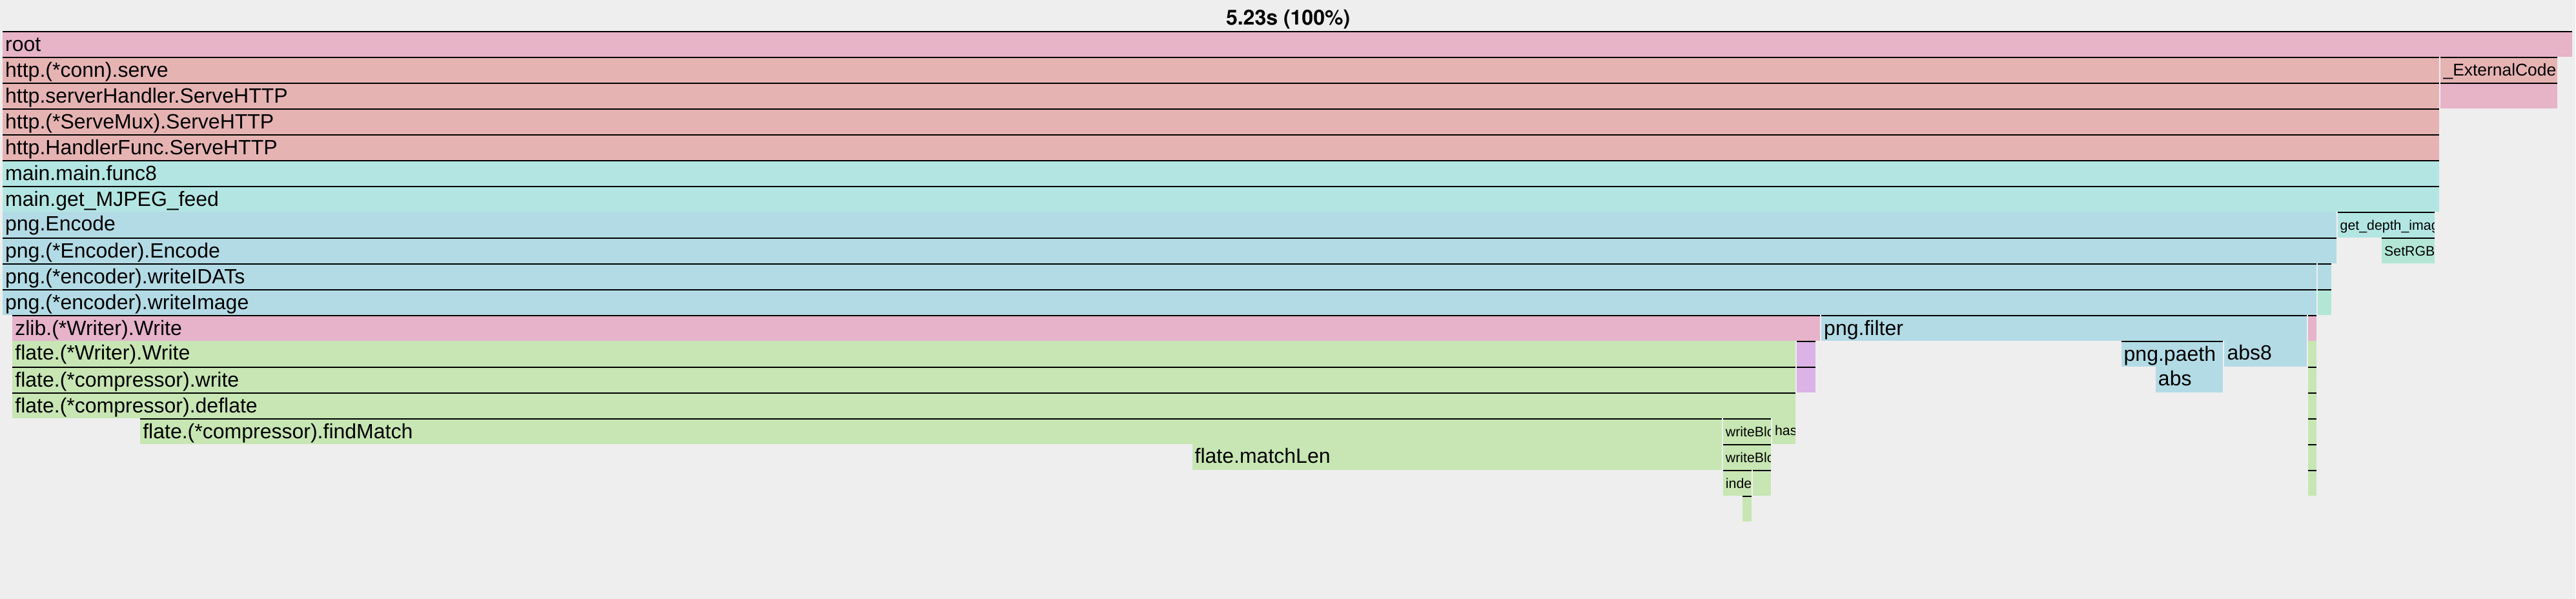
Moving to JPEG compression alleviated performance constraints and allowed for mixed streams, with encoding times now comparable to data fetching, again 10 to 25 ms.

C’s transitions was quite complex, as libPNG and libJPEG are quite different in usage, parameters and expectations for input data. The encoding step had similar performance issues, so the transition was need, but I decided to create a separate file altogether due to how different the two libraries are.
For example, while libPNG will happily digest input data of with any bits-per-pixel value, libJPEG defines this when the library is compiled, so it’s limited to either 8 or 24 bits, depending on if it’s RGB or greyscale.
Thus, the 10 bit depth data image had to be parsed into RGB components, similar to the Go implementation, while the original PNG version ingested the raw buffer without a hitch.
Results
The results are all similar in practice, with Python being more resource intensive and a bit less responsive, but not as much as I expected.
Go and C have very similar performance and memory footprint.
The major difference was in the work needed to achieve this, with Python being by far the easiest to use, GO in a nice valley of simplicity and compatibility and C much deeper in the weeds.
Nonetheless, this was a nice exercise and allowed me to delve deeper in these languages, especially Go and C.
Python is as usual very comfortable in itself but quite fiddly with environments, libraries, versions and such. The raw developer experience is very fast and perfect for quick iterations, but redeployment and longer term support aren’t going to be fun.
C is always stimulating in its simplicity.
There’s no hidden magic or abstraction layers, the system is laid quite bare to you. For abstract problems and scientific work it can be very nice, but in more general usage it’s a very different experience from other languages. Tooling is more fragmented, libraries can be sparsely documented and less popular, and the granular control becomes a double-edged sword.
Go feels like a nice middle ground, with mature tooling and libraries, decent documentation, interoperability tools and performance.
The future?
This took a lot longer than I hoped, especially on the C front, and drained my desire to work with the hardware and go so in depth on the coding side for a lil bit, but I might come back to his in the future, as I already have some ideas on what to do with the hardware now.
For specific improvements here we have a lot of possibilities, from using multiple threads in Go and C to enhance performance, moving to the asynchronous version of the library to access some additional image modes and perhaps lower latency a bit, testing on more hardware and on multiple OSes, there’s always room for improvement.
But for now I’m done here.